

We thought our backyard wasn't big enough for a raised garden bed. This made us really sad because McKay and I both love plants and its been a dream of ours to have our own garden. Our backyard has a lot of stuff: playground set, basketball court, shed, a large cement patio, patio furniture, and a grill. We started to think smart and figured out where in our backyard got the most sun. We found that the southeast side of our house got the most sun. We thought, can we put a raised garden bed up against our house and a window well? And a light bulb went off!
This is what the perfect spot looked like before we did any construction. Right above this spot is our kitchen window.

To prep the the ground for the raised garden bed we started by removing the grass where the bed was going to lay. We found the easiest way to remove the grass was to cut a line in the grass with a shovel and then use it again to cut the roots underneath, and roll the grass back.

This is what the spot looked like after we ripped up and out the grass.

McKay is very proud :)

The next step was to dig out where the bed is going to go. McKay dug 1 1/2 feet into the ground for the bed to lay in. Below is an example of what that looks like.

The next step is to measure! Measure the width and length of your bed. Because we had a window well in the middle, we measured the two sides of that, the width, and the length of the front piece. Then we were off to Lowes!

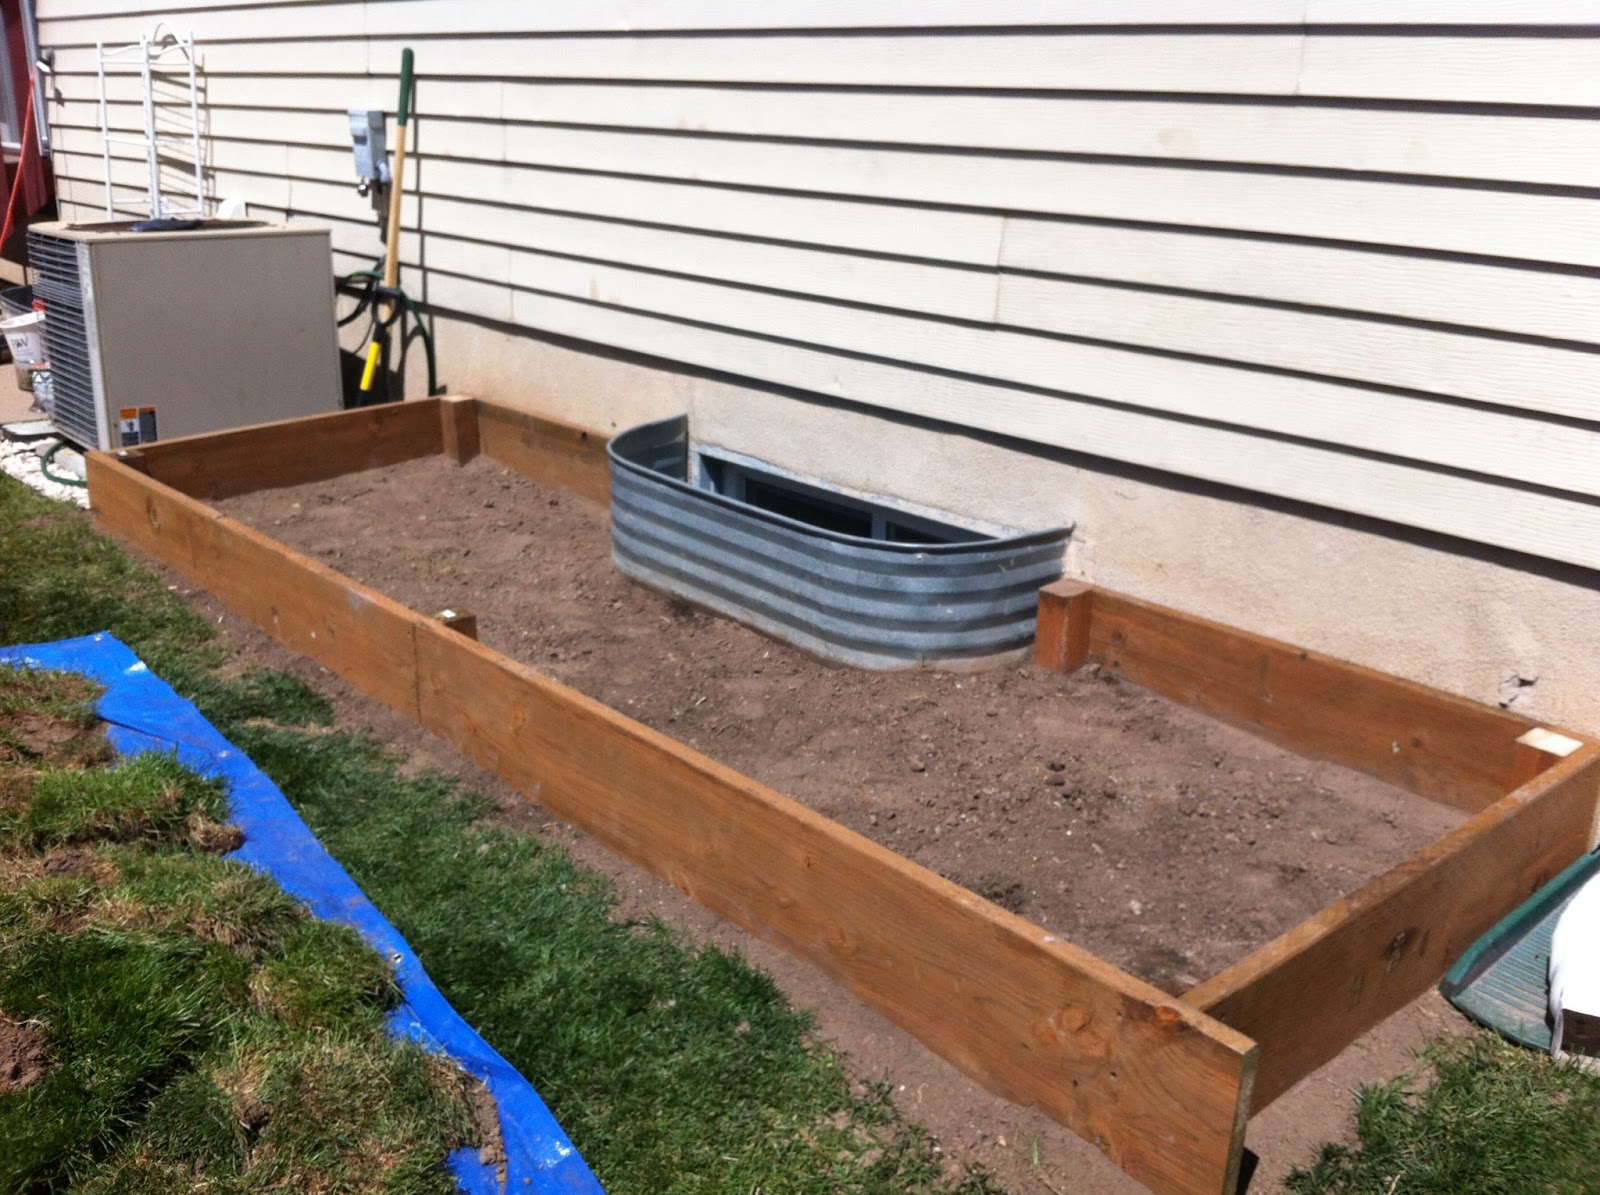
Awful lighting

After much discussion with the building supply employees at Lowe's they suggested we use pressure treated lumber. We purchased three 2" X 8" X 12' boards for the bed itself. For the posts we purchased an 8 ft and a 6 ft section of 4" X 4" pressure treated lumber. We used 2 1/2" galvanized screws so they don't rust. Look at that little toe head below.

McKay used a circular saw to the cut 2 4 ft long sides and 2 4 ft sides for against the house, and 27 ft long boards for the front. It looks like this.

McKay then pre drilled holes with an electric drill into the boards where the posts would be attached. This is where he placed the posts.


McKay used a clamp to help screw the boards and posts together because I was too busy taking pictures of him doing the work.

After McKay screwed the corner pieces he put them into the pre dug holes in the ground.

He used a lever to make sure the boards were leveled into the ground.

If the boards weren't level he used a hammer and another piece of wood (so he wouldn't dent the pressure treated wood) to get the boards into the ground more.

After McKay installed the corner pieces and leveled them out, he then finished by screwing in the front piece. The front piece was held together by the middle post. McKay had to trim the corners so they aligned up real nice!
We purchased (8) 2 cubic feet bags of dirt and filled the bed up!

Now that we're parents and more sentimental. McKay came up with the cute idea of cutting a heart out of the extra wood with a jig saw and putting it on the front of the garden bed for Amelia. It's corny and cheesy, but we thought it would be fun to tell Amelia that we built this garden bed before her first birthday and we can call it Amelia's Garden. How tender, huh? Even Winston likes it.

Synopsis: And there you have it! This took us an entire weekend to built and we spent around $180 on supplies. It wasn't hard at all to make. Because of the location of our bed and the window well, we had to customize it a bit, but it wasn't hard and turned out great. I'm so happy we can check this off our list. If you have any questions about the raised garden bed e-mail me at cfrysauceandgrits@gmail.com!

Supplies Needed
Shovel
Gloves
Sunscreen (we live in a high altitude place and we're translucent so this is very important)
Pressure Treated Wood 2 X 8 X 12
Pressure Treated 4 X 4
Galvinized Screws
Circular Saw
Leveler
Electric Drill
Hammer
A lot of dirt

It looks great! I love the added heart - that was my favorite part.
ReplyDeleteLooks great! I need to do something like this!
ReplyDeleteYou're so sweet. When you make yours and need help, you contact me! I'd love to help you.
DeleteWhat a 'lovely' little garden space! You will get so much enjoyment watching your little garden grow. I have a tiny little raised garden bed too. I think mine is even smaller than yours but it was so productive last summer. Good stuff came out of that bed! ;)
ReplyDeleteThanks for the encouragement Sherry! I find my husband going outside just to look at it because he's so proud. Haha, gotta love men and their plants! What did you plant in your garden this year?
DeleteThis is an awesome flower bed! I love the heart, it's my favorite part! Thanks for sharing at our Make Bake Create party!
ReplyDeletehttp://therookieseamstress.com
Thanks Vanessa for visiting our small and humble site! I'm going to come back and party!
Delete